What’s in this guide?
In this document we reflect on questions and considerations for gathering online video data for multi-modal analysis via platforms such as Zoom and Teams. We draw on our experiences of collecting multi-modal data for the IVO project. We provide practical guidelines for selecting and using platforms for recording online meetings, and for storing and sharing data. Since the majority of participants in virtual meetings use a desktop computer or laptop, this document gives information related to these devices specifically. Mobile phones and tablet features may be different to those presented here.
Note: A reminder that when collecting data of this type, all participants must give full consent to record their contributions – this is an ethical prerequisite to capturing and analysing virtual meetings. Please refer to our document on ethical guidelines for more information on best practice for this.
The details contained in this document are correct as of August 2022.
Click on any of the following for more information:
- What’s in this guide?
- Choosing a video recording platform
- Typical functions of the online platform
- Saving the data: locally or to the cloud?
- Recording data automatically
- Speaker view or gallery view?
- Recording in gallery view
- Including participant names in recordings
- Panel positions
- Screen sharing
- Recording text chat
- Breakout rooms
- Sharing recordings
- File size
Choosing a video recording platform
Many of us are familiar with the most popular platforms for online meetings (e.g. Zoom, Microsoft Teams, Google Meet). These all provide more or less the same core functions of video and/or audio-based calls, but there are some features which distinguish each platform, and which may influence how data are captured for the purposes of multi-modal analysis. Of course, the appropriateness of each platform will be determined by the needs of those involved in participating and organising the virtual meetings, and the specific research questions being explored in your project/analysis.
A survey undertaken for the IVO project showed that Zoom and Microsoft Teams are by far the most popular platforms for professional meetings. 77% of 371 respondents used either Teams or Zoom for team meetings.
Overall, we found that Zoom offers more flexibility and options for recording that tend to make it a more attractive platform for use in projects such as this. For example, Zoom provides options to record in different configurations such as speaker view or gallery view while Microsoft Teams only records in gallery view. For this reason, most of the examples given here are taken from Zoom, with some from Microsoft Teams. Many of the examples we give will also be transferable to other platforms such as Google Meet, Slack ac Skype.
Typical functions of the online platform
Image 1 shows a typical Zoom view with buttons and their functions labelled.

Image 1: Zoom window with functions labelled
Saving the data: locally or to the cloud?
One of the first things to think about is whether to record a meeting locally or to the cloud. Local recording allows users to record a meeting’s video and audio to a local computer i.e., to the user’s hard drive. Cloud recording allows users to record to a cloud or online storage and includes options such as audio transcription of the recording, which local recording does not facilitate.
Whether you choose cloud or local may determine the view type that the recording is captured in. For example, cloud recordings of Zoom meetings are set by default to record in speaker view, even though the meeting itself may be in gallery view. You can adjust this in Zoom’s advanced settings when creating a meeting (see Speaker view or gallery view?).
Recording data automatically
In the IVO project we wanted to capture meetings in their entirety, including the interaction before and after the meeting proper, e.g. openings and closings, greetings and social interaction prior to and after the discussion of business items. The best way to do this is to enable a platform’s auto recording function. The alternative to this is for the meeting host to begin recording manually in which case, depending on your focus for analysis, key data may be lost.
In Zoom and Microsoft Teams, the automatic recording function can be chosen as an option during the meeting set up (see image 2 for selecting this in Zoom via advanced options and image 3 for selecting this in Microsoft Teams via Meeting options).
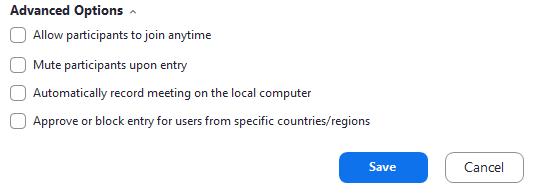
Image 2: Advanced options including automatic recording in Zoom
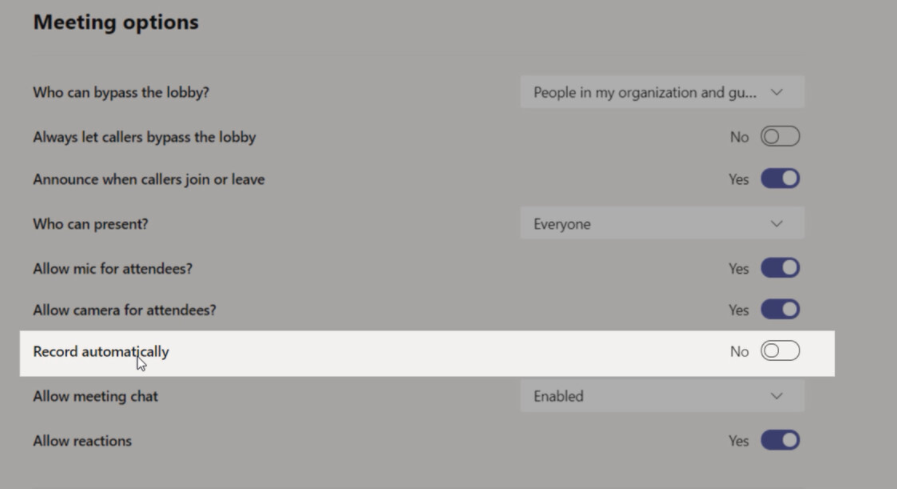
Image 3: Automatic recording in Microsoft Teams
Speaker view or gallery view?
Video conferencing platforms have multiple viewing options to allow individual users what to prioritise on their screen. For example, in Zoom you can view other participants in speaker view (image 4) or gallery view (image 5). These preferences may often be determined by the device that is being used and the size of the screen. Participants can typically choose which view they prefer and can toggle between these different viewing options at any time (see top right icon in image 1).
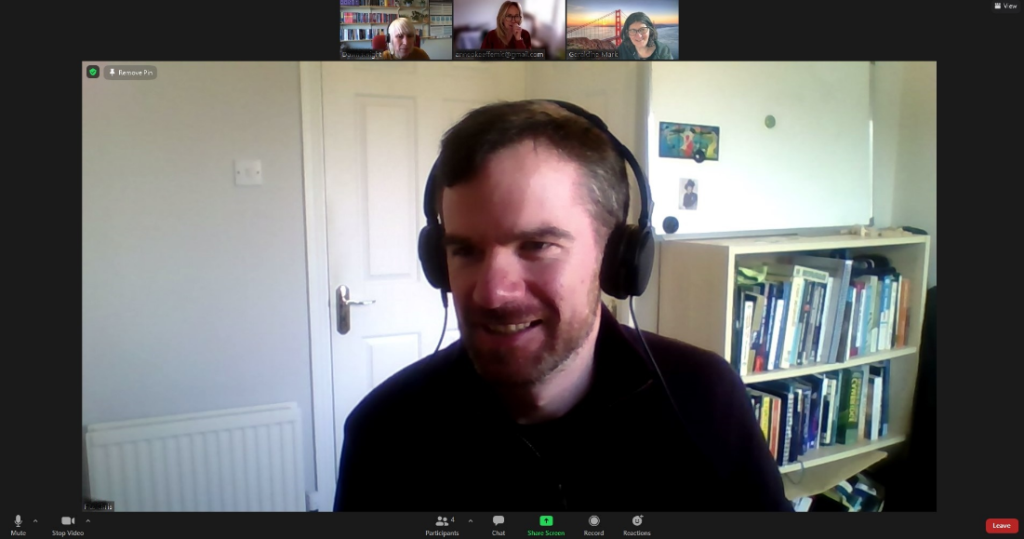
Image 4: Zoom’s active speaker view
Smaller screens, such as those on tablets or smartphones, might be better suited to the speaker view where the person speaking is displayed in a large window. If you are in speaker view, the recording will only display the video of the active speaker (unless record gallery view is chosen in call setup – see tip below). This may be best if you want to focus solely on the person who is speaking, but if you are looking at group interaction and the use of gestures, for example, speaker view is limiting. For the IVO project we wanted clear views of the movements and gestural activity of other participants so that we could also look at communicative functions such as active listenership backchanneling, turn-taking and floor management, which makes gallery view most appropriate for our purposes.
The gallery view (image 5) displays each participant in video panels that are the same size and distributed throughout the window. Depending on a user’s central processing unit (CPU), the gallery view recording can display a maximum of 25 or 49 participants on a single screen in Zoom. This option is best suited to capturing video data that includes all participants.
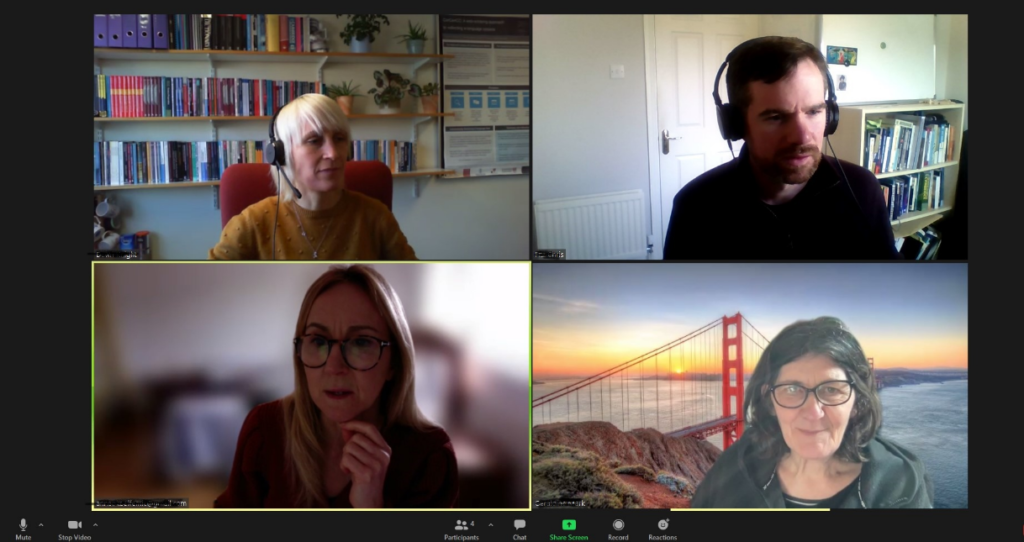
Image 5: Zoom’s gallery view
In Microsoft Teams there are several different video layouts to choose from, depending on the size of the meeting and the number of participants you’d like to see on your screen at once. These are know as Gallery, Large Gallery, ac Together mode.
By default, all meetings are set to Gallery layout, displaying participants in 2 x 2 or 3 x 3 grids. If there are more than nine people attending, you can change the layout to the Large Gallery view—the default view when you join a desktop or mobile meeting. If there are more than 49 people in the conference, Teams will prioritize the people who have their video turned on and those who are speaking the most.
For attendees who do not have their video turned on, the Microsoft Teams app will show their profile picture or their initials if they haven’t added a photo.
Recording in gallery view
You can make sure that the meeting is recorded in gallery view by selecting ‘record gallery view’ in your settings when setting up a call. Whilst some participants may view the call in different ways (i.e. by selecting different viewing options), this will mean that the recording is restricted to the gallery view only. For Zoom, follow these steps (also see image 6):
- Before you start your meeting, log into your Zoom account in your browser.
- Go to Settings -> Recording -> Untick “Record Active Speaker with Shared Screen” and tick “Record Gallery View with Shared Screen”.
- Be sure to click “Save”. This means that gallery view will be the recorded view.
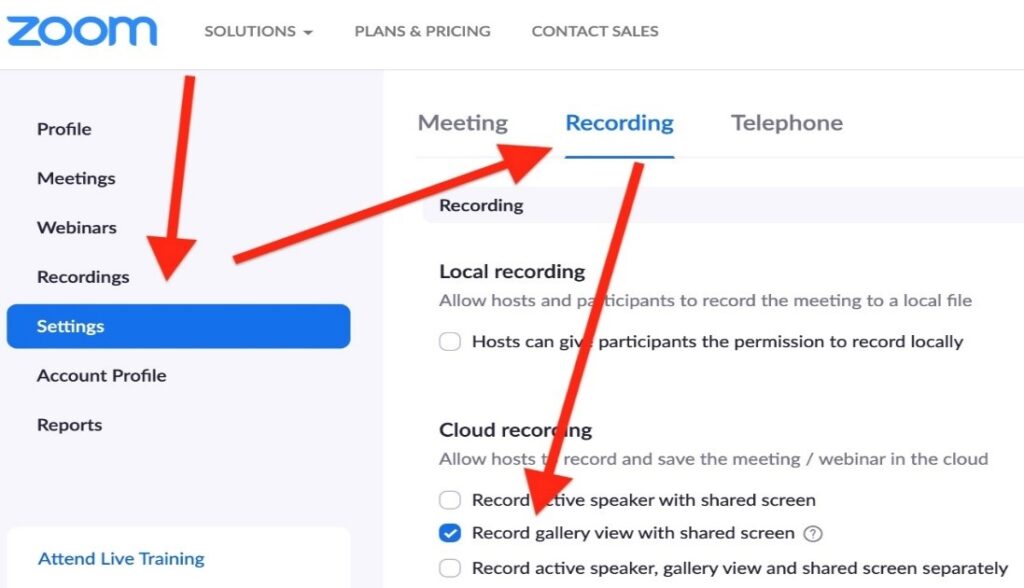
Image 6: Setting up zoom to record gallery view
As of the time of writing, Microsoft Teams only facilitates recording of gallery view, despite other viewing modes being selected. There are multiple fora online of users expressing frustration at this, so this might be adapted by Microsoft Teams in the future.
Including participant names in recordings
You may want to have the names of attendees recorded in your data, provided attendees have given consent for their names to be used. In Zoom, participants’ names can only be recorded in cloud recordings (see Saving the data: locally or to the cloud?). If recording to a local drive, even though names will be displayed in the meeting, they won’t be included in a local recording. To ensure that names are recorded, set this up when arranging cloud recording (image 7):
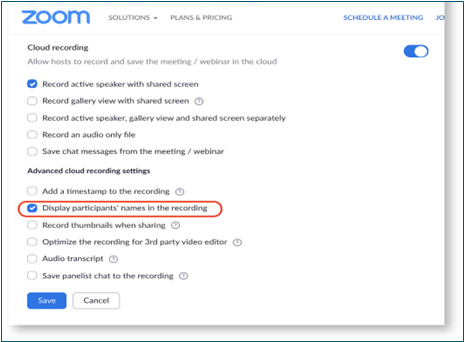
Image 7: Zoom’s cloud recording options
Panel positions
For a research project such as the IVO project, which may need to consider facial expressions, gestures and upper body movement, both camera positions and the positioning of panels on users’ screen play an important role in capturing data. It is firstly important that participants have cameras positioned at a distance to capture the full upper body, including hands. As gaze and gaze direction are important factors in a multi-modal analysis profile, the positioning of panels on participants’ screens may be a relevant consideration as this influences the interpretation of the direction of gaze during a meeting. When in Zoom’s gallery view, a user can click and drag videos to create a custom video order. After the first change, all other participant tiles will remain in place until moved. New participants will be added to the bottom-right. A custom order is seen only by the participant who has created it, or the host can deploy their custom view to all participants. This order can be released, and the order will revert to the default setting.
Tip: This option to share a custom view with all participants will standardise the view and result in the ability to know who each participant is looking at in a recording at all times. Otherwise, this might be difficult to determine as each participant’s screen layout/view will be different. While Microsoft Teams does not provide this function to share a custom view, it does have a spotlight feature which puts a focus on a particular person in a meeting and makes them appear larger for everyone. This can be achieved by the organizer right-clicking on a participant and clicking ‘spotlight’.
Screen sharing
When participants share their screens during a video call, viewing options change to prioritise the shared content (e.g. a PowerPoint presentation). The video display will automatically shift to a different view when a user shares their screen. Some platforms automatically grant sharing rights to all participants, but others, such as Zoom, only grant sharing rights to the host and so the host will have to give permission to others to share using the share screen button. Sharing screen will minimize the panels of participants to a sidebar, known as ‘side-by-side mode’.
Tip: The best option for recording Zoom calls locally while sharing a screen, to minimize the limitations on viewing participants, is to select ‘thumbnail gallery view’. In this mode, if a participant shares their screen, participants’ video will appear in the top-right corner. If you drag or minimize the thumbnails, it will still appear in the top-right corner in the recording (image 8).
Image 8: Local recording of shared screen in Zoom with thumbnail view
Recording text chat
In addition to recording video and audio, the text chat that participants contribute to a meeting can be recorded. This chat might be relevant to capture an optimal representation of the communication taking place in the meeting. In Zoom, in-meeting chats can be saved either manually or automatically. To manually save the chat in Zoom:
- Click chat during the meeting.
- At the bottom of the chat window, click the ellipses (…)
- Click Save Chat.
This will save your chat to your local recording location. Once the transcript is processed, it will appear as a separate .vtt text file within the list of recorded meetings. The default is your Documents folder / Zoom / Folder with meeting name, date, and time.
To set chats to save on the cloud with Zoom, follow these steps:
- Click on settings in the navigation menu
- Click the Recording tab
- Under Recording, click Cloud recording to enable or disable it
- Under Cloud recording, select the Save chat messages from the meeting / webinar check box
- Under Advanced cloud recording settings, select the Save panelist chat to the recording check box to allow more files to save from the webinar
- Click Save
Breakout rooms
Both Zoom and Microsoft Teams facilitate the use of breakout rooms which give users the option to split participants into smaller groups. Breakout rooms are not recorded in a standard recording setup. While breakout rooms are taking place, the host room (or ‘main room’) continues to be recorded.
In Zoom, the host needs to allow recording before opening the breakout rooms. If the host has already opened the breakouts rooms, they can join your breakout room to allow you to record. Click ‘record’ in the meeting controls to start a local recording (see Image 1).
Similarly, in Microsoft Teams, breakout rooms can be recorded by the host entering the breakout room and clicking record in each room that the host wants to record. Once the meeting finishes, the recordings will process and the host will then have separate videos files for each of the rooms.
Sharing recordings
Meeting files will need to be shared between meeting participants and researchers and amongst the research team for analysis.
Zoom cloud recordings are easy to share by creating a shareable link (see section on sharing below).
Microsoft Teams meetings are recorded to OneDrive and SharePoint for sharing across organisations and between contributors.
Note: Ethical considerations might also determine the mode by which files can be shared (if at all) and stored for future use. Some ethical guidelines as well as the preferences of the participants themselves may prohibit the sharing of content using links and only provide for sharing directly.
File size
Email servers do not have the capacity to attach large files such as videos, so other cloud servers such as Google Drive or Dropbox or encrypted file transfer systems might be considered as optimal sharing platforms. These too have limitations on storage capacity and might need premium or institutional accounts to extend storage at a financial cost to you or your institution. For example, Dropbox Basic has a capacity of 2 GB, Dropbox Plus 2,000 Gb and Dropbox Professional 3,000 GB. The latter comes at a cost of 16.58 Euros/14.69 GBP per month.
There are several factors that affect the file size of recordings including the resolution, duration, and amount of content shared in the call. As a result, you might notice variations in the size of recorded files. Recording screen sharing uses about 20MB of storage per hour while recording video uses about 200MB of storage an hour. This is an approximation, since the resolution and types of video or screen sharing content can affect the amount of storage used. The internet speed and connectivity of the individuals involved in the meeting may also influence the quality of data captured. Both video and audio may be impeded by poor internet speeds. The minimum internet speed recommended for adequate video and audio capturing is 20mbps. Anything less than this may cause interruption, freezing, dropping out or stilted audio and video which can impede the progress of the meeting and thus influence the communicative efficiency of the event.
The compression of files might be a preferred option if files must be shared via email. Applications such as WinZip (both Windows and Mac) are popular and efficient compression tools. In addition, to provide more manageable file sizes, users might want to cut video files into smaller chunks. This can be achieved through standard desktop tools such as Microsoft photos or iMovie for Mac.
The tool that will subsequently be used to analyse the data will influence the determination of the file type to be used. The current version of ELAN (Brugman and Russel 2004), for example, has the capacity to facilitate a range of video file formats and all of those which Microsoft Teams or Zoom create are supported by ELAN (see document on data annotation for further details). Both Microsoft Teams and Zoom automatically record in MP4 format. Additional files may be stored for additional content such as chat (see Recording text chat).